
ALL YOU NEED TO KNOW ABOUT THE 2025 JAPANESE GRAND PRIX
Legendary Figure-8 Layout, Relentless High-G Corners Demanding Ultimate Driver Precision, Extreme Tyre Stresses Amplified by 2025 Resurfacing, Frequent Safety Cars and more
Suzuka International Racing Course consistently ranks among the most popular venues in Formula 1, often mentioned in the same breath as Spa-Francorchamps by drivers and fans. This reverence stems from the formidable technical challenge presented by its 5.807-kilometre layout and the passionate atmosphere created by the Japanese fanbase. Originally designed by Dutchman John Hugenholtz (also credited with Zandvoort) as a Honda test track in 1962 – the circuit remains Honda-owned and neighbours one of its main Japanese factories – Suzuka quickly became a staple for both two- and four-wheeled motorsport. It stands as a true old-school circuit, largely unchanged, pushing F1 cars to their absolute limits and demanding exceptional skill, rewarding bravery while punishing the slightest misstep.
Circuit Characteristics and Challenges
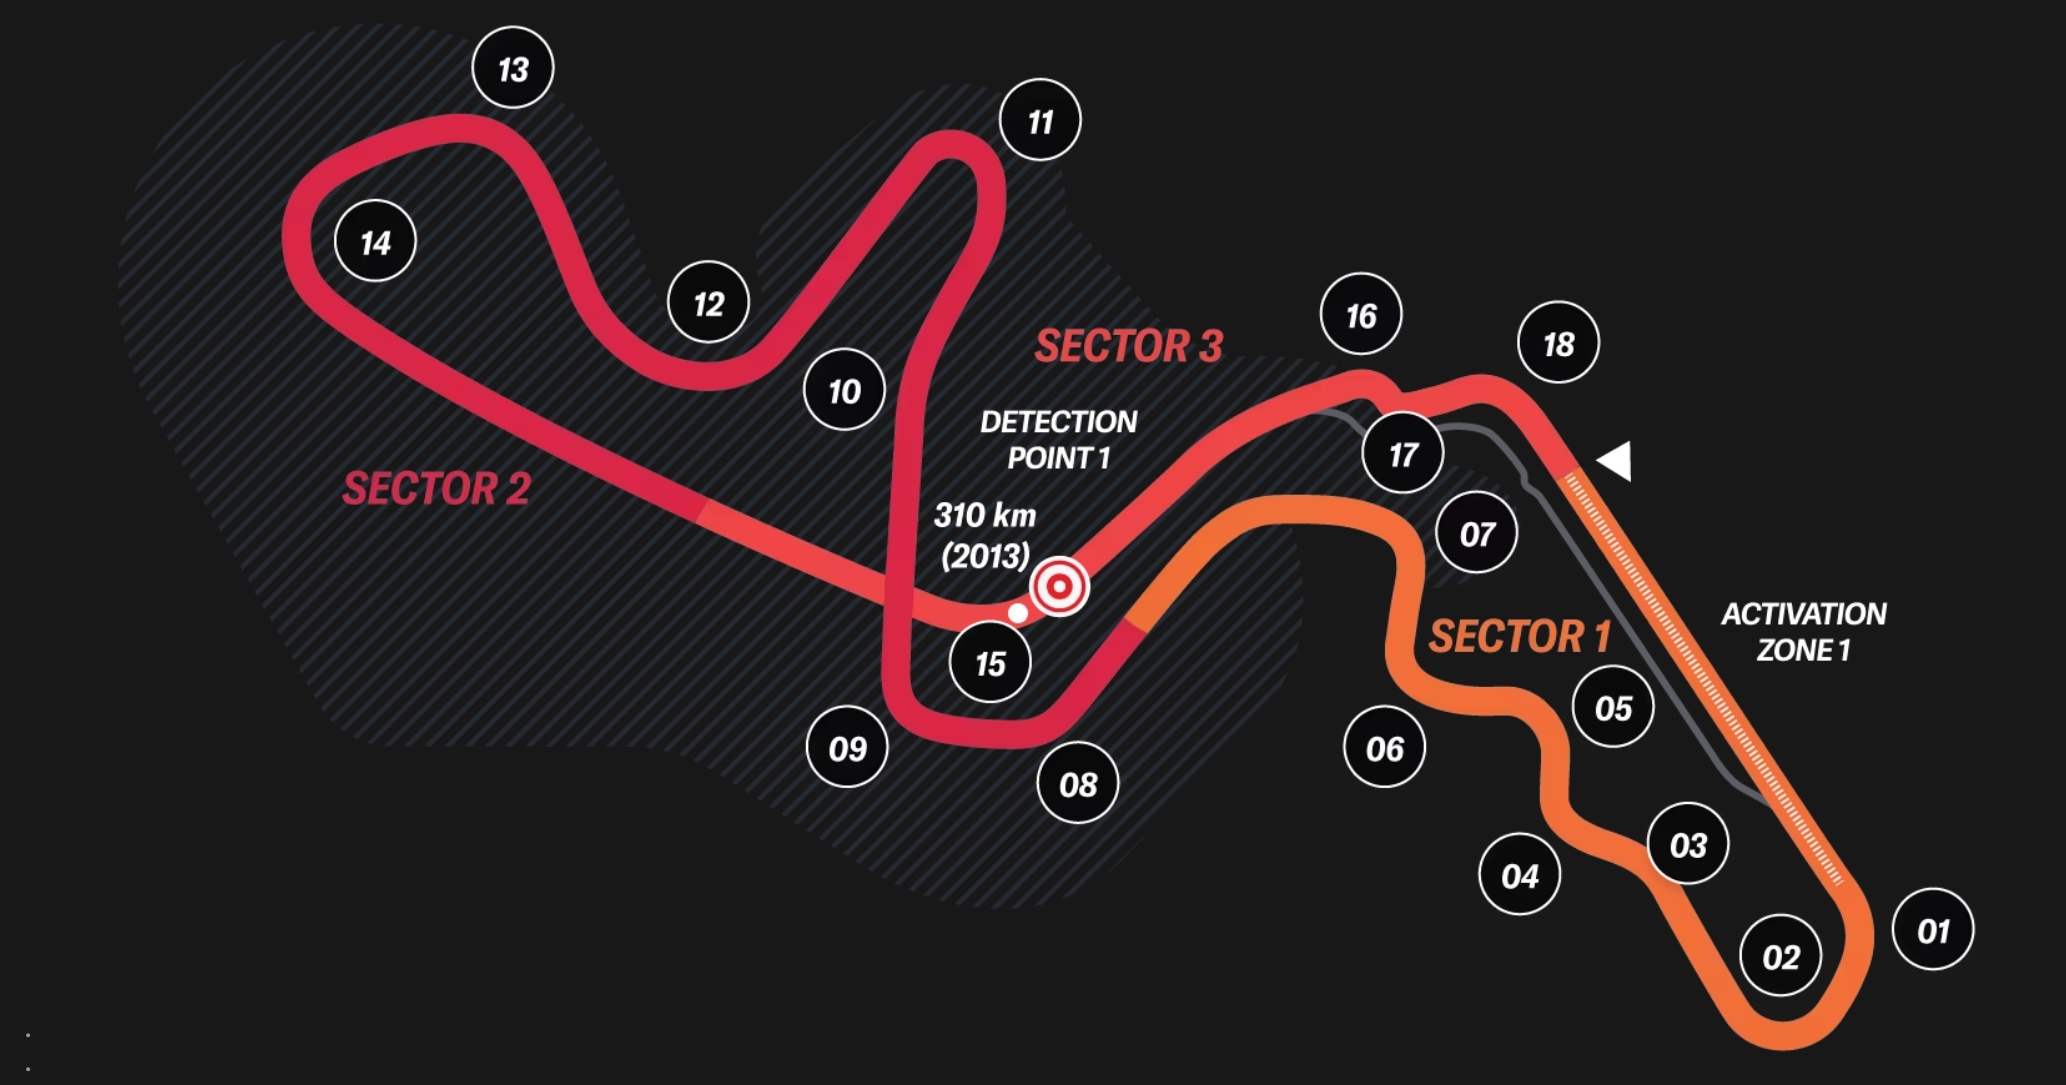
Suzuka's defining feature is its unique figure-of-eight layout, the only one on the current F1 calendar. After navigating the Degner Curves (Turns 8 and 9), the track passes under the straight leading towards the high-speed 130R corner. Consequently, Suzuka is the only F1 track incorporating both clockwise and anti-clockwise sections within a single lap.
This figure-of-eight design contributes positively to tyre management. The layout features 10 right-hand corners and 8 left-handers, creating a more even balance (a 55/45 split) compared to many circuits. This helps distribute cornering loads more equally between the left and right tyres, mitigating asymmetrical wear patterns.
However, the lap is relentless. The vast majority of the 5.807 km distance involves some degree of lateral G-force, with only 1.2 km spent driving in a perfectly straight line. This near-constant cornering places significant demands on both car and driver.
Forces Acting on Tyres:
Suzuka is classified by Pirelli as one of the most demanding tracks for tyres, particularly concerning lateral forces, earning a '5' rating (the highest) alongside circuits like Barcelona, Silverstone, Spa, Zandvoort, and Lusail. Tyres in F1 endure complex forces:
-
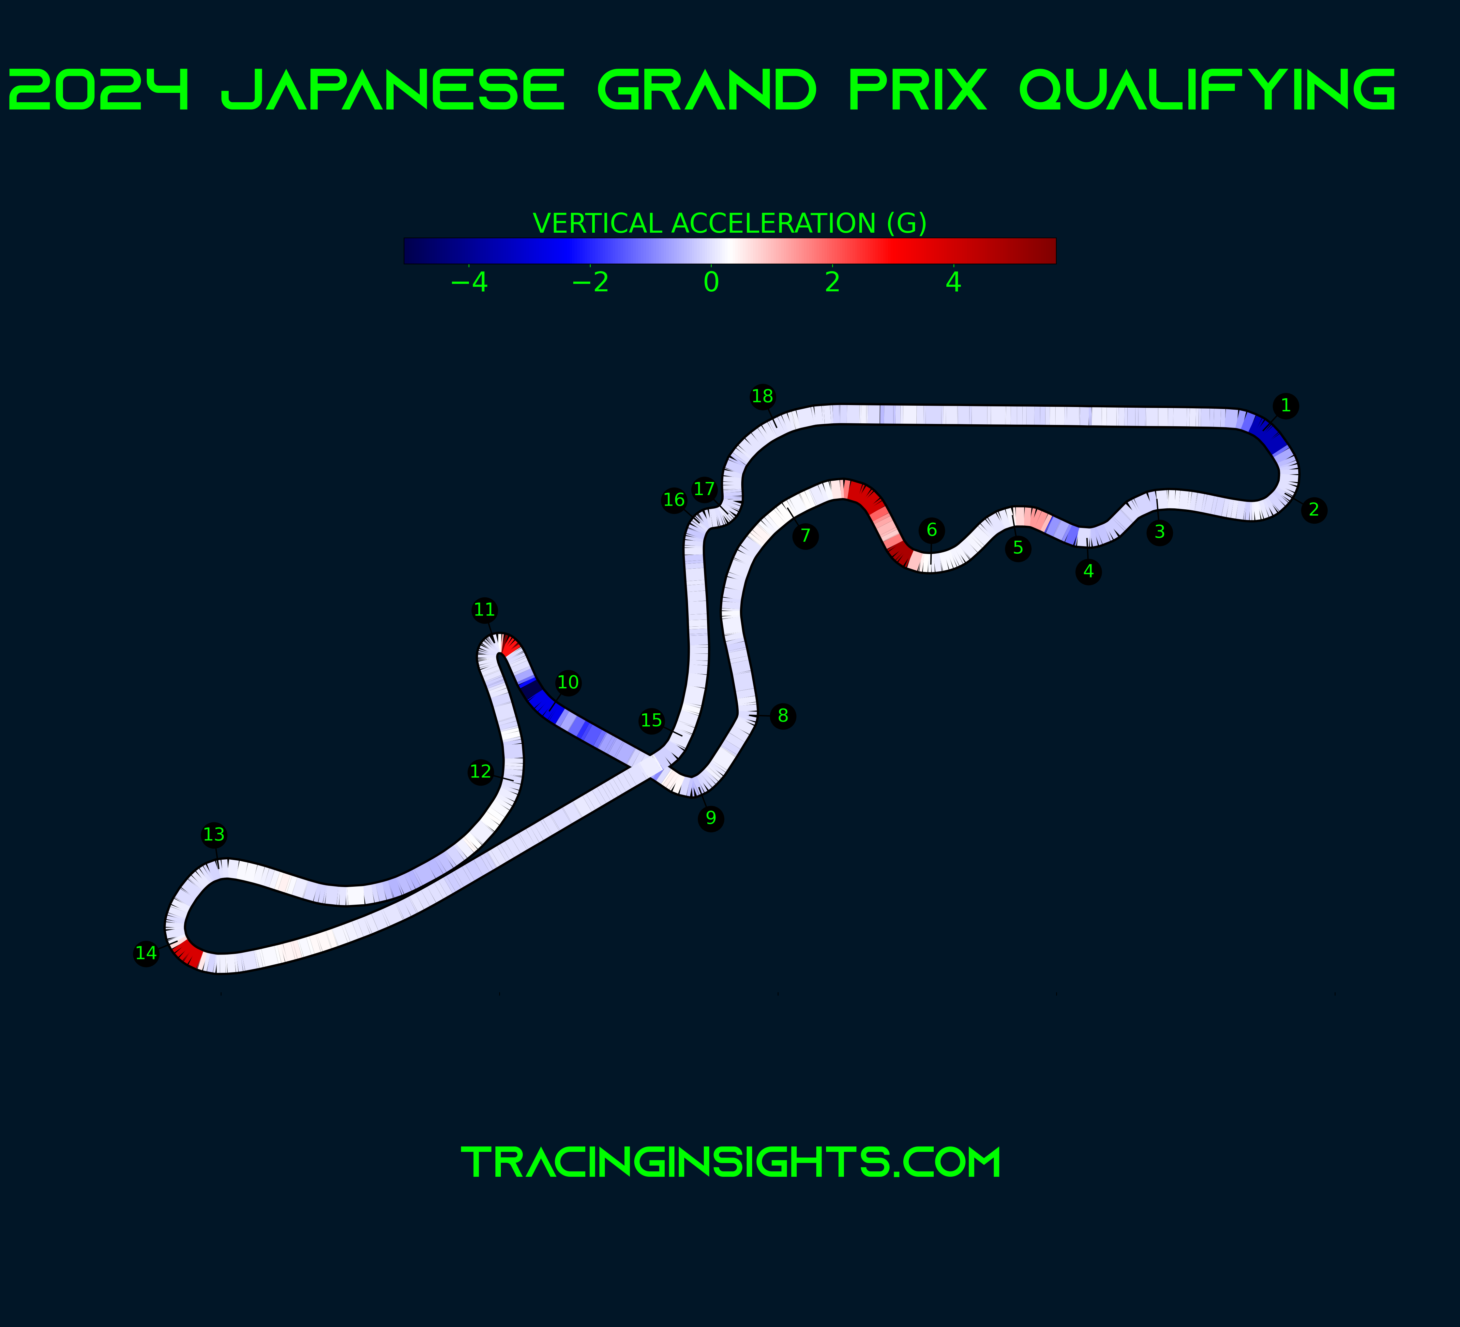
Vertical: Resulting from the car's weight plus aerodynamic downforce (wings and floor).
-
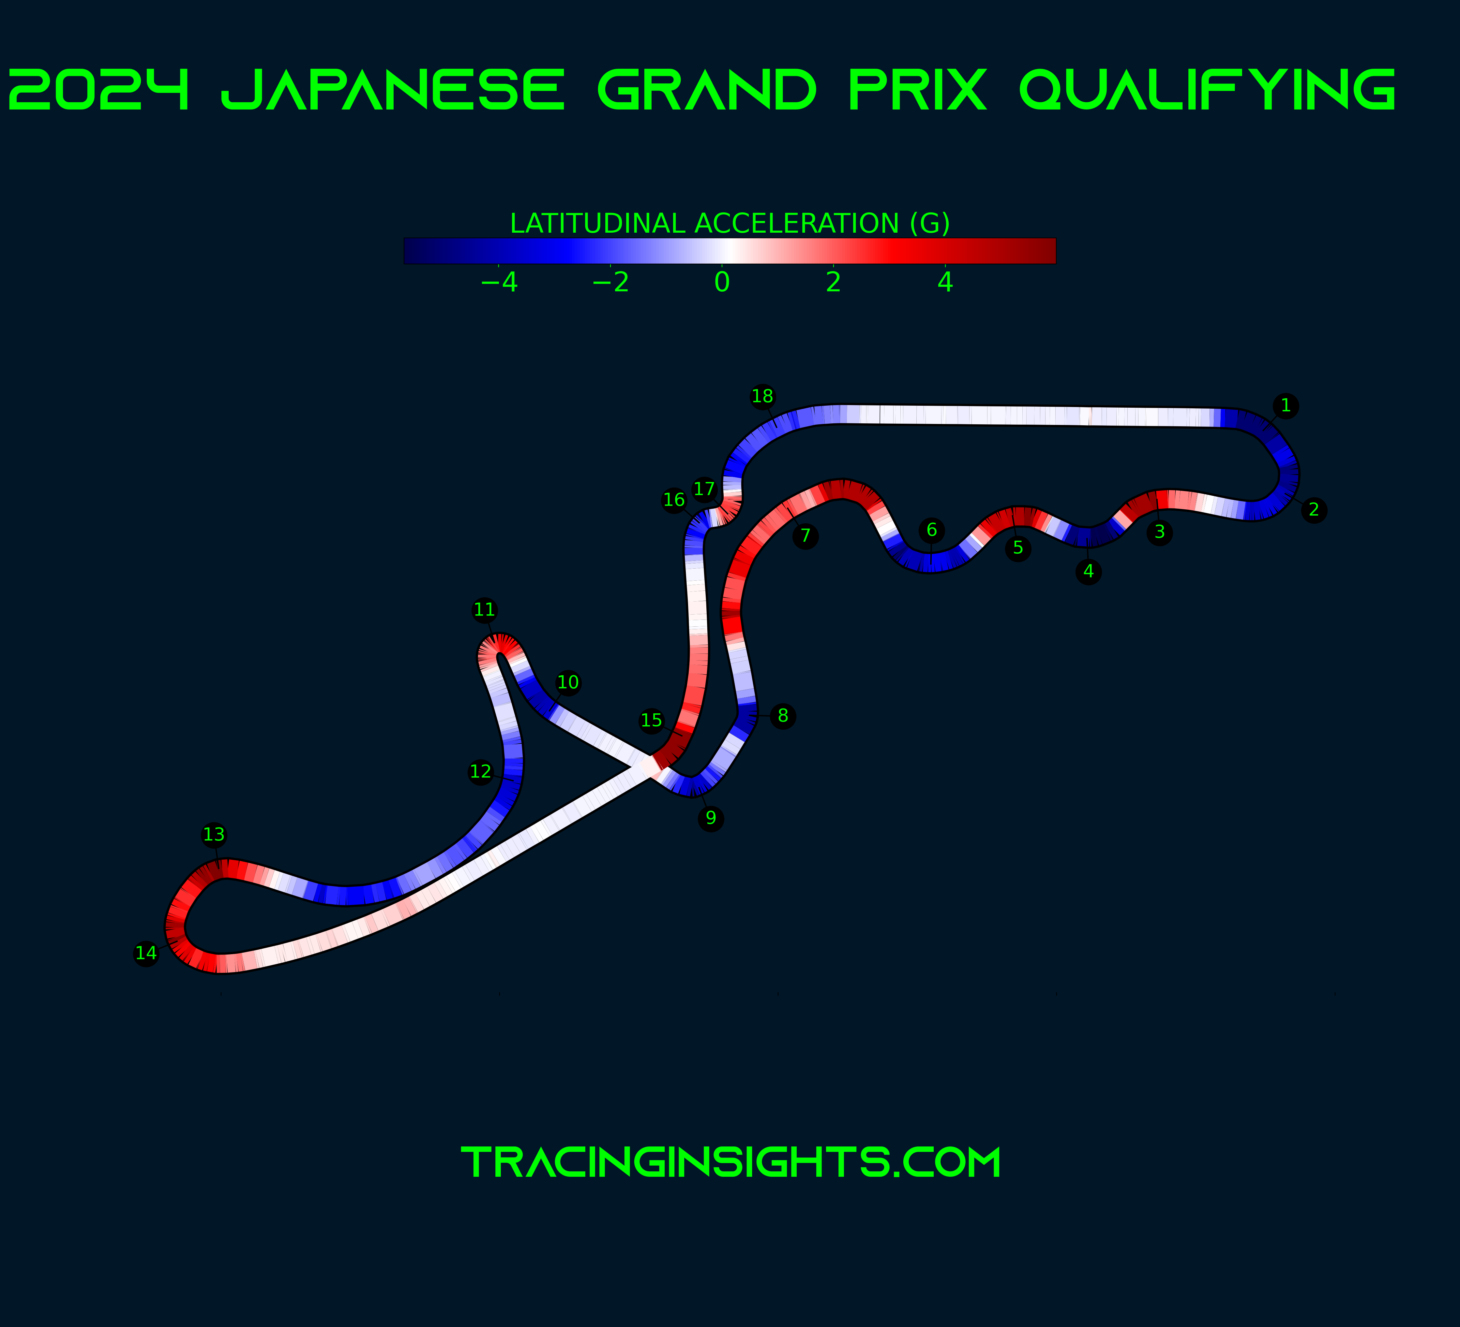
Lateral: Generated during cornering as weight transfers outwards. These forces increase with speed and can reach up to 4G at Suzuka, stressing the tyre structure.
-
Longitudinal: Exerted during acceleration and heavy braking, potentially reaching up to 5G on tracks with sharp corners following long straights.
Resurfacing and Track Evolution:
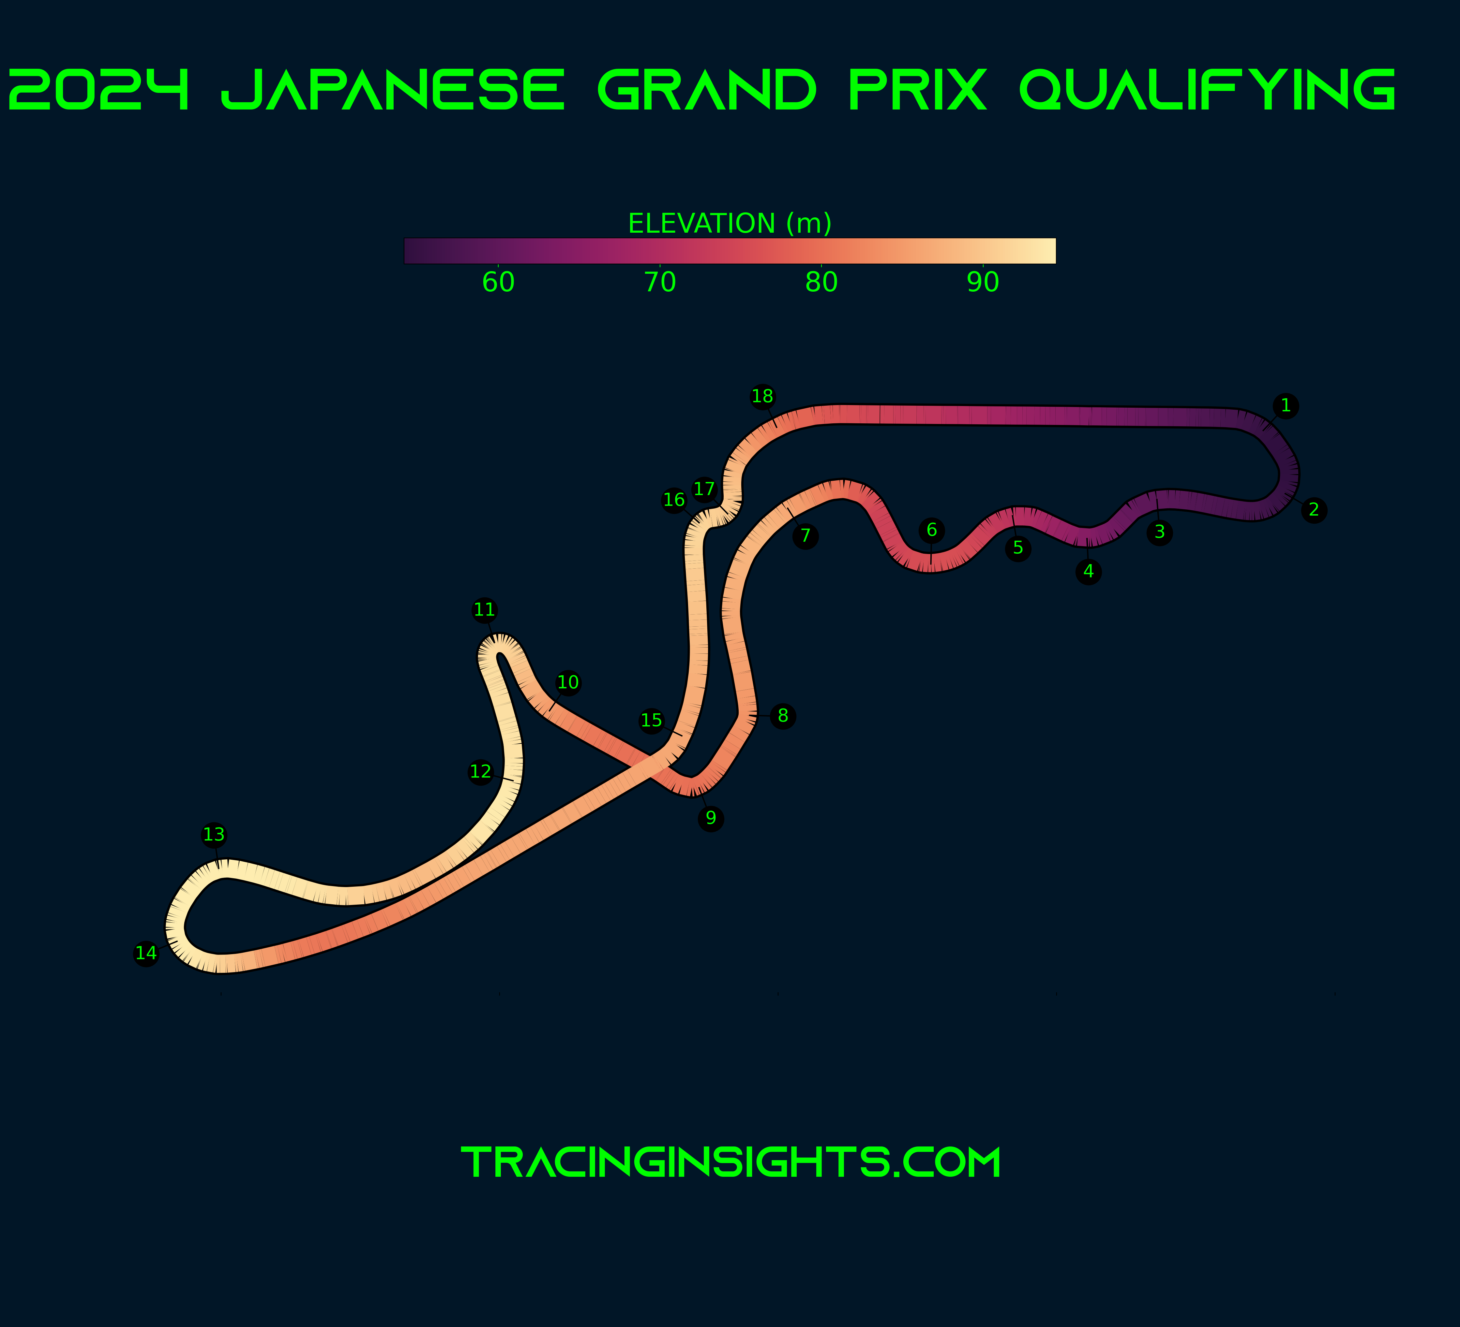
For the 2025 event, a significant portion of the track has been resurfaced. This new asphalt covers the area from Turn 1 up to the entry of Turn 8. This includes the critical medium and high-speed corners like Turn 1, Turn 2, and the entire Esses sequence (Turns 3-7), where tyres experience substantial stress. It's a key area for finding lap time so understanding the grip characteristics and evolution of this new surface will be crucial from the outset of practice. Pre-event simulations suggest the combined effect of this new surface and the 2025 car improvements could lower lap times by approximately 1.5 seconds, a figure to be verified on Friday. Suzuka is generally a busy circuit, having hosted other major events this year, which might influence how quickly the track rubbers in.
Minor Track Modifications (2025):
Beyond the resurfacing, minor changes include adjustments to kerbs and run-off areas. Notably, at Turn 9, the previous single kerb has been replaced by a higher double kerb. Additionally, synthetic grass on the outside of Turns 2, 7, 9, 14, and 17 has been replaced with gravel traps.
Pit Lane and Technical Features:
Starting Grid Inclination:
A unique feature is the sloping finish line on the main straight. This means drivers on the starting grid must hold the car on the brakes right up until the moment they release the clutch when the lights go out to start the race.
High Mass Sensitivity:
Suzuka exhibits one of the highest mass sensitivities of the season. This means the lap time penalty for carrying additional fuel weight is particularly pronounced here compared to other circuits. This factor heavily influences qualifying importance and race strategy calculations regarding stint lengths and fuel loads.
Key Corners:
-
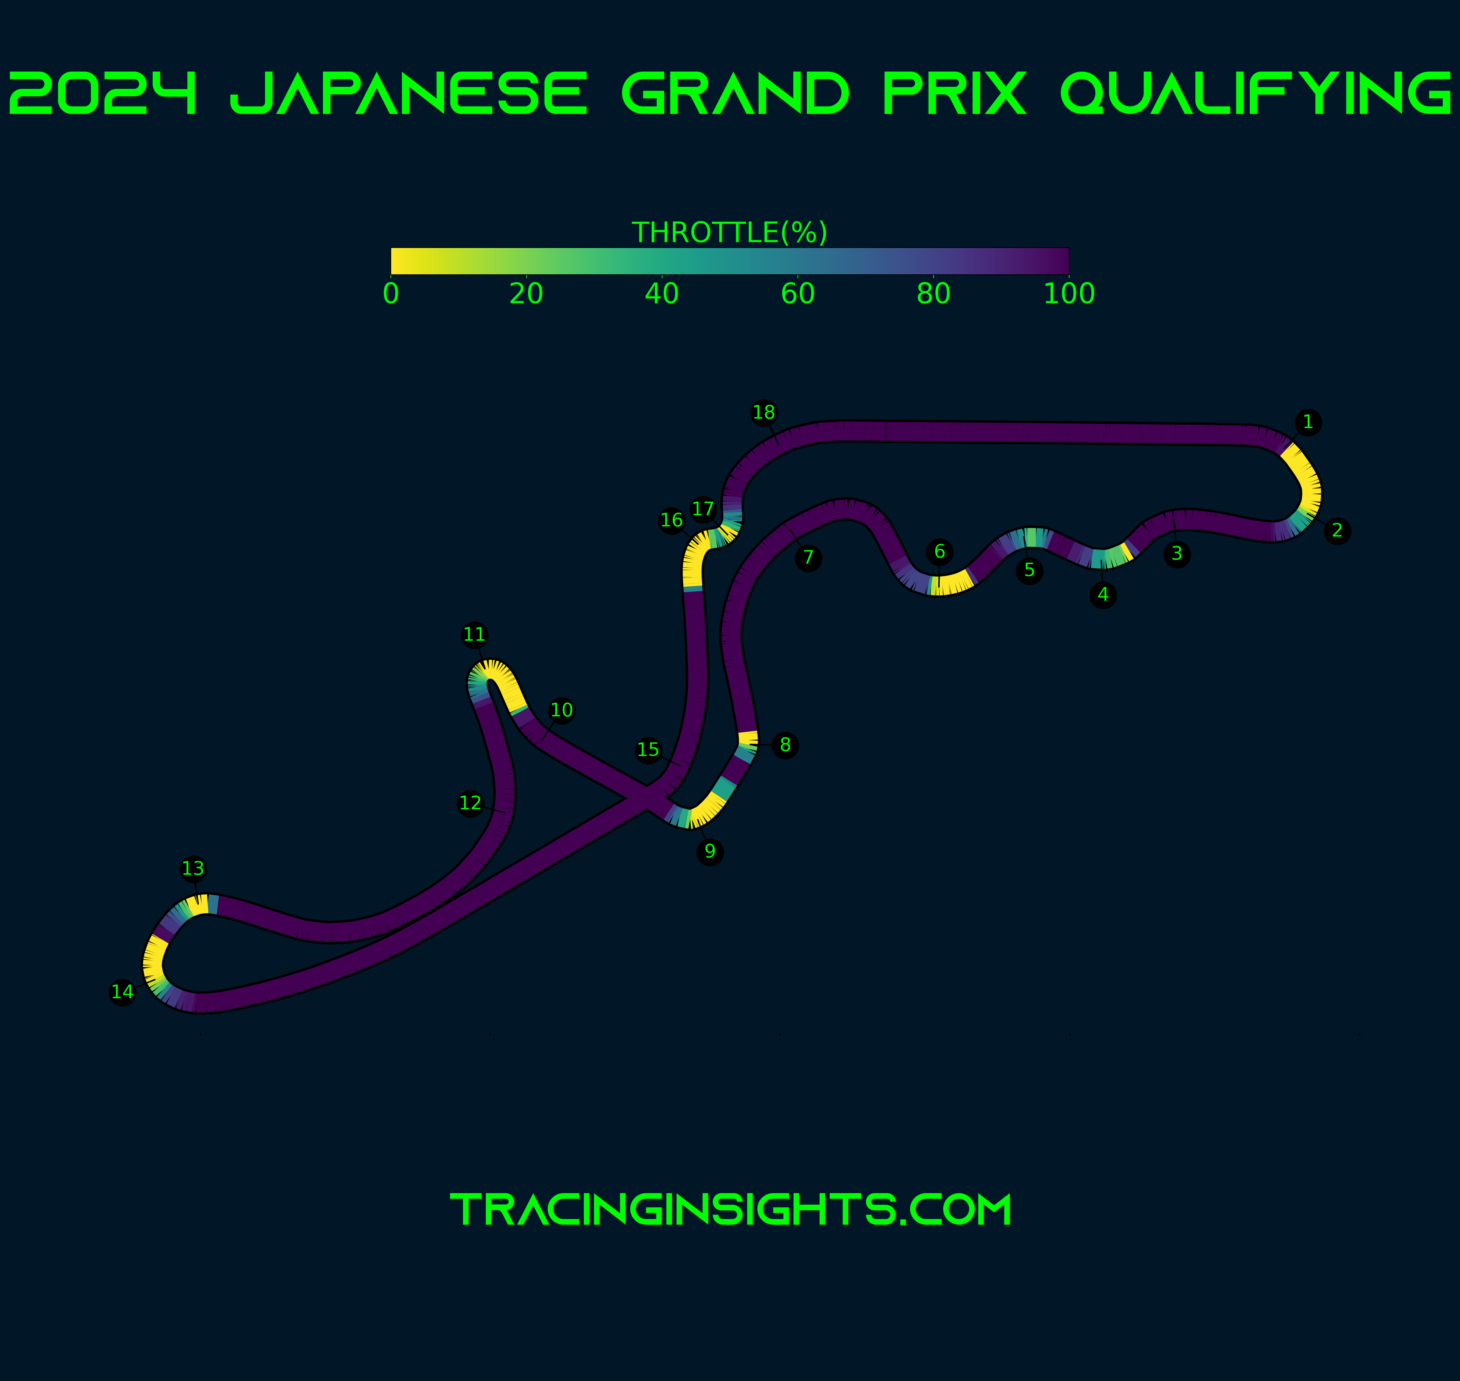
Turn 1 & 2: The lap begins with a fast, downhill approach. Turn 1 entry requires no initial braking; drivers typically brake deep into the corner while already sustaining high lateral Gs (approaching 5G in Quali). This generates very high steering wheel torques. Turn 2 follows, leading uphill into the Esses. The vast majority of the first sector at Suzuka is spent cornering. From Turn 1 until the exit of Turn 7, the steering wheel is moving almost continuously for nearly 2km of the lap.
- The Esses (Turns 3-7): A defining sequence reminiscent of Silverstone's Maggots-Becketts-Chapel complex, but with more elevation change. This rapid succession of five medium/high-speed direction changes (left-right-left-right-left) demands exceptional car balance, aerodynamic efficiency, mechanical grip and driver precision. Cars flow through here in fourth or fifth gear, entering around 245 km/h. The steering wheel is in almost constant motion for nearly 2km through this section. Mistakes here are costly. Bordered by grass and gravel, the track is relatively narrow. The wind direction plays a significant role here. Being a few kilometres from the coast, Suzuka features switching onshore and offshore breezes. With a headwind into the Esses, the car has more downforce and is quicker. The impact on laptime isn't massive, but the feeling in the cockpit can be very different.
-
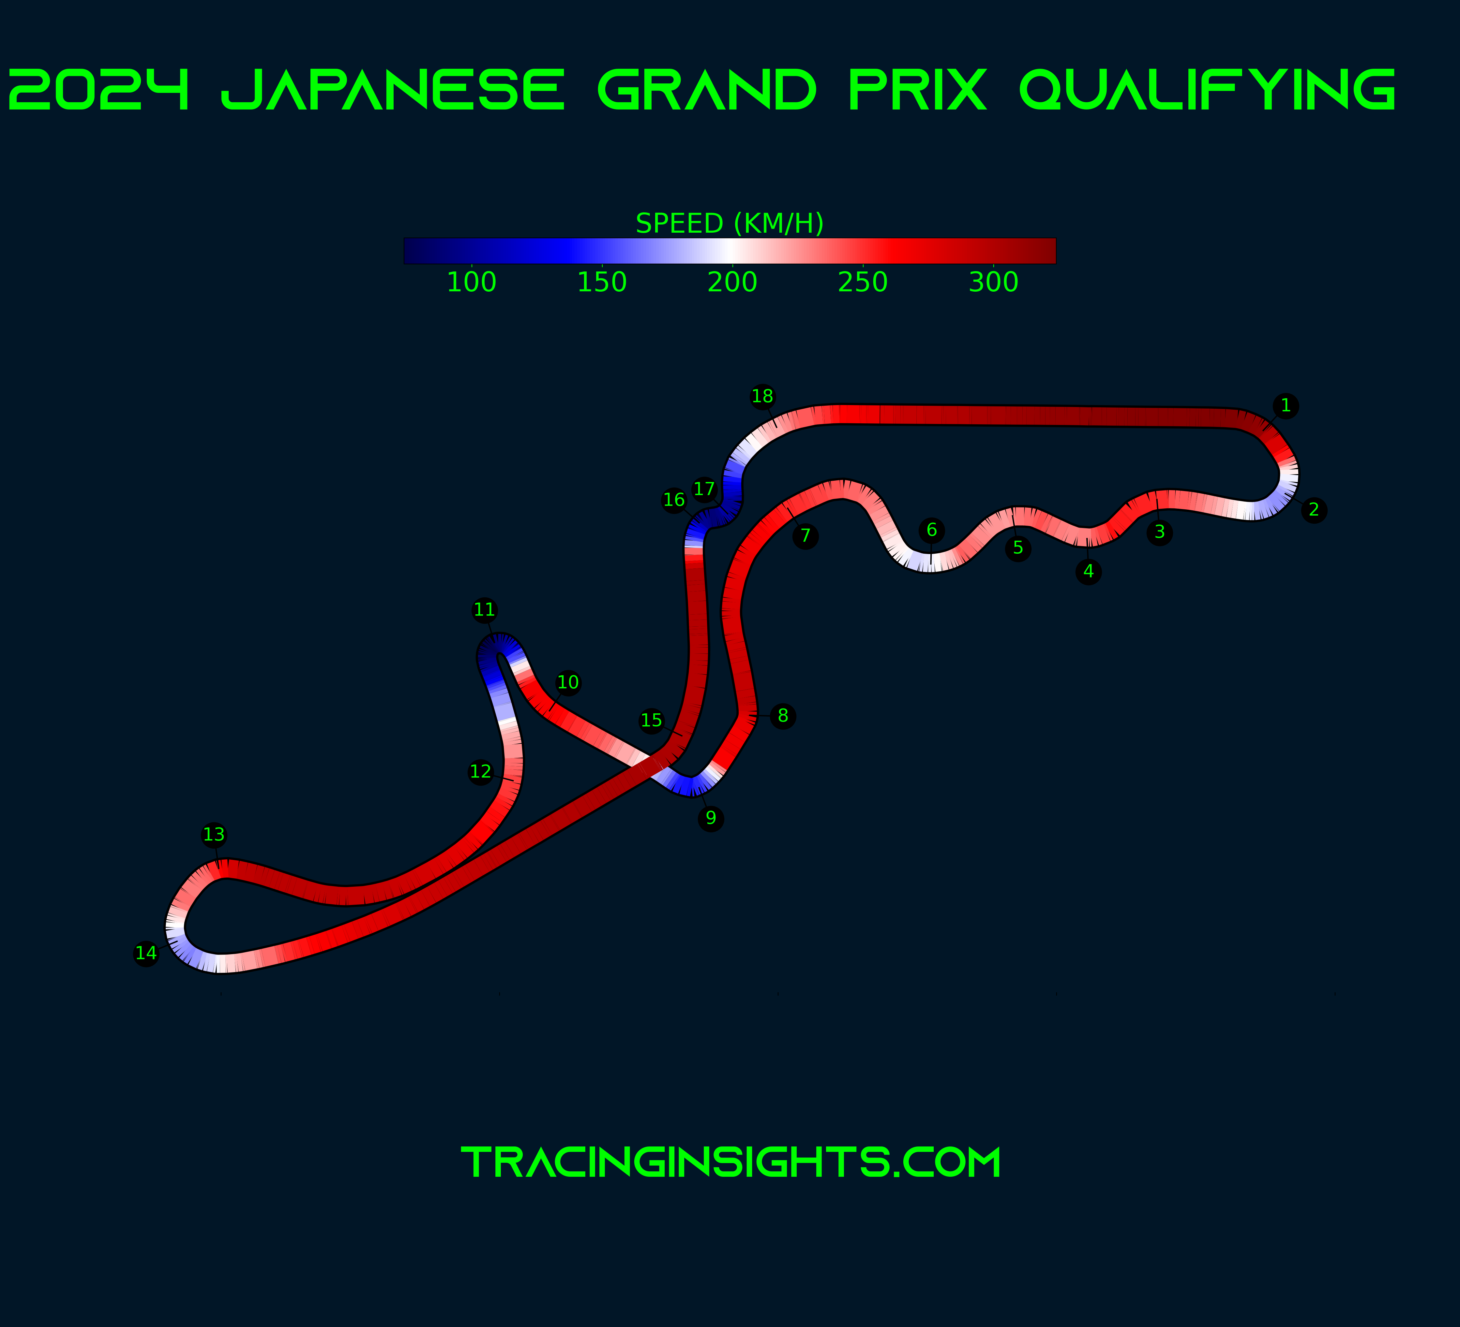
Degner Curves (Turns 8 & 9): A tricky double-right hander threading the eye of a needle. Degner 1 (T8) involves leaping across the kerb, while Degner 2 (T9) is tighter with minimal run-off and waiting tyre barriers. Carrying too much speed into T8 often compromises tighter T9 and mistakes are plentiful.
-
Hairpin (Turn 11): One of the slowest corners at approx. 60 km/h. The challenge lies in the braking zone, which occurs during the preceding fast right-hand Turn 10 while the car is under high lateral load (close to 3.5G). This frequently causes lock-ups.
-
Spoon Curve (Turns 13 & 14): A long, double-apex left-hander leading onto the back straight towards 130R. Requires precise throttle application on exit.
-
130R (Turn 15): One of F1's most iconic and quickest corners. Named after its original 130-metre radius, this daunting, sweeping left-hander is taken at speeds approaching or exceeding 300 km/h (taken at 295 km/h to over 300 km/h), often flat-out or with a minimal lift in eighth gear. It demands immense driver commitment.
-
Casio Triangle (Chicane, Turns 16 & 17): A low-speed right-left chicane immediately following 130R. Presents a setup challenge: the high-speed nature of Suzuka favours a stiff car, but softness is needed here to effectively use the kerbs for a good exit onto the main straight.
Racing Considerations:
Setup Compromise:
The contrast between the high-speed sections (like the Esses and 130R) demanding aerodynamic efficiency and stiffness, and the low-speed chicane requiring compliance to ride Kerbs, forces teams into setup compromises. Getting the chicane right is vital as it leads onto the sole DRS zone and the only real overtaking opportunity on this narrow trac.
Driver Skill:
Suzuka demands absolute precision from drivers on every single corner, constantly pushing the limits. The flowing nature and rapid changes of direction reward smoothness and accuracy.
Safety Car Probability:
Due to tight confines, limited run-off in places, and potentially tricky recovery access, incidents often trigger a Safety Car. Interventions occurred in 7 of the last 10 Japanese GPs, often multiple times. This high probability (approx. 70%) necessitates flexible race strategies.
Tyre Selection and Strategy:
Compound Allocation:
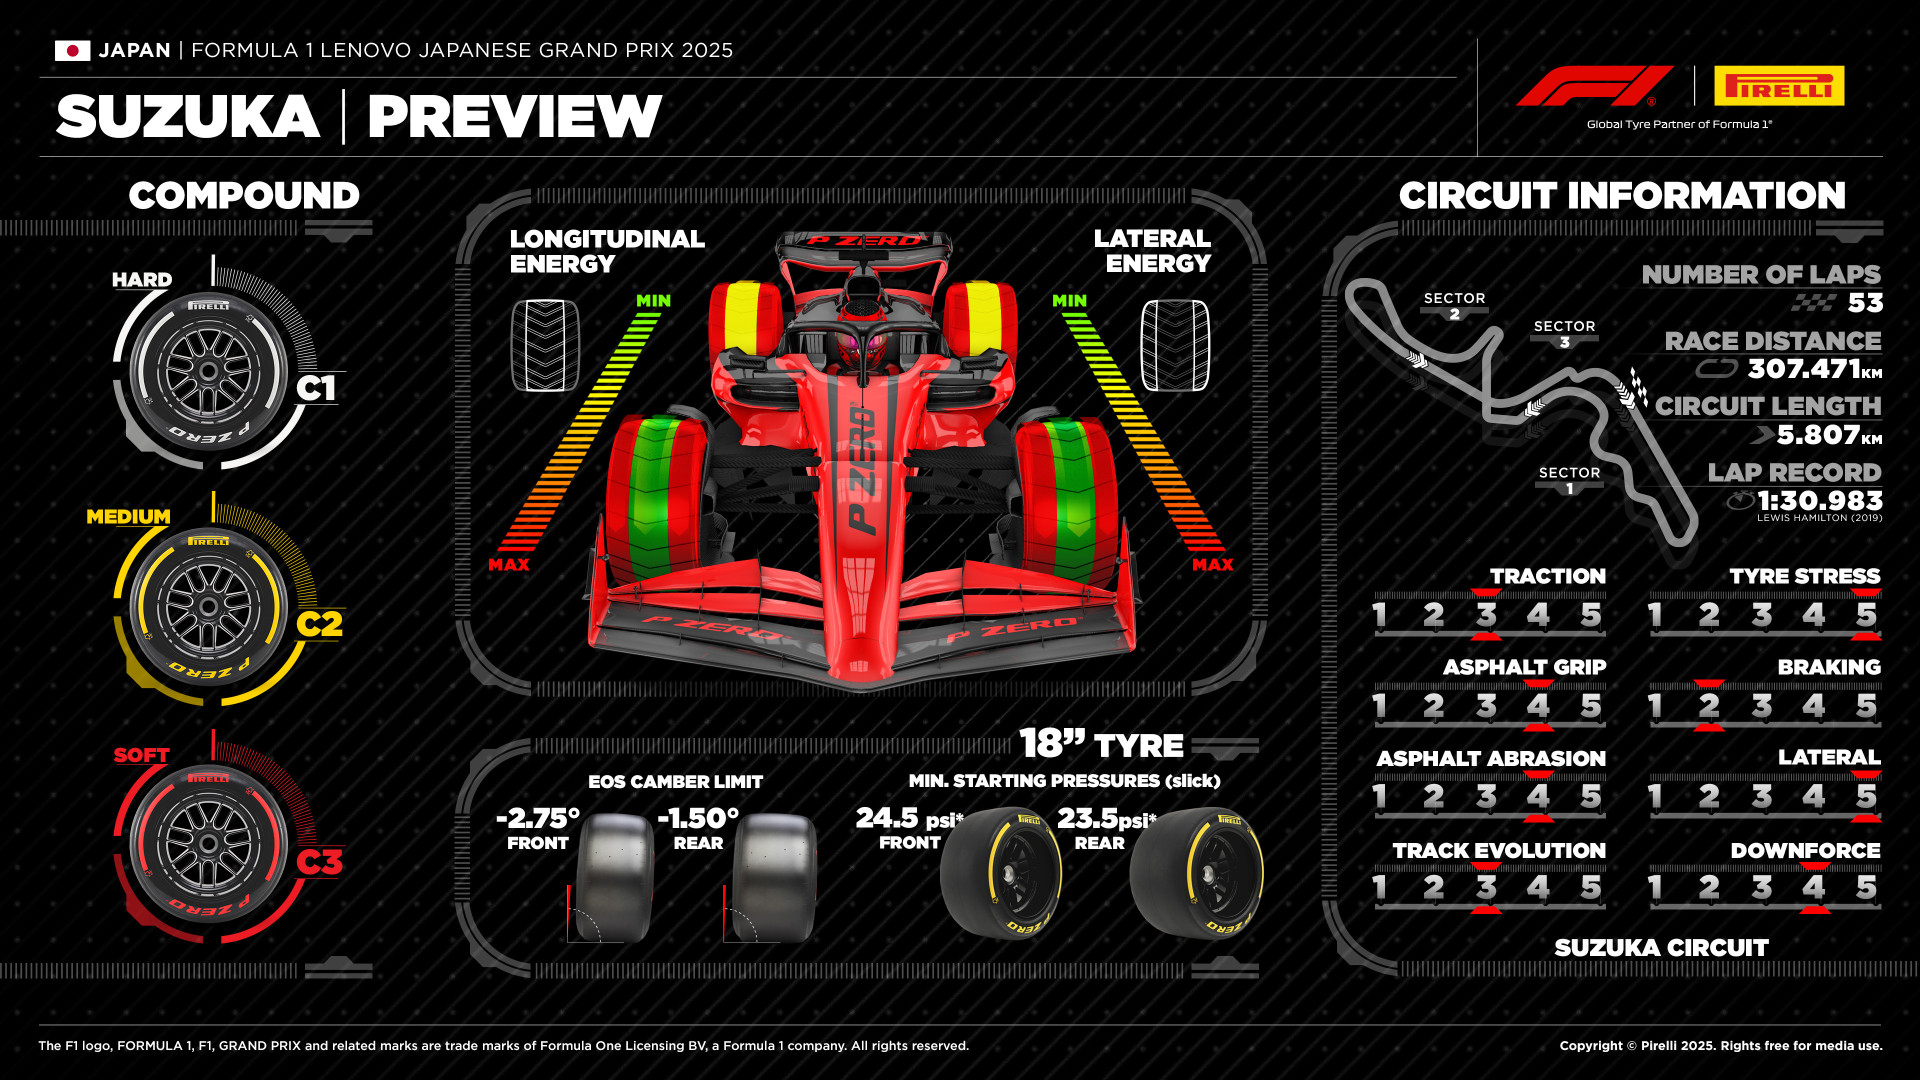
Pirelli has selected its hardest available compounds for the 2025 Japanese Grand Prix:
-
C1 (Hard): Making its season debut. Reportedly the most similar to its 2024 iteration.
-
C2 (Medium): Undergone changes, generally softer than 2024.
-
C3 (Soft): Also changed, softer than its 2024 counterpart.
This choice reflects the high lateral loads through corners such as high-speed 130R, track abrasiveness, and overall stress placed on tyres at Suzuka.
Strategic Implications:
The combination of the new, potentially grippier resurfacing in Sector 1 and the softer C2/C3 compounds compared to last year introduces variables. Teams will need extensive analysis during Free Practice to understand degradation, performance differentials, and the impact of the new asphalt. Minimum starting tyre pressures have been slightly adjusted based on simulations (Front: 24.5 psi, Rear: 23.5 psi), subject to verification with track data.
The increased performance differential between the 2025 compounds might make a one-stop strategy more complicated than in the past, although track temperatures and the actual behaviour of the resurfaced sections will be key factors.
TRACK CHARACTERISTICS
TRACTION
3/5
TYRE STRESS
5/5
ASPHALT GRIP
4/5
BRAKING
2/5
ASPHALT ABRASION
4/5
LATERAL
5/5
TRACK EVOLUTION
3/5
DOWNFORCE
4/5
Last Year's Strategic Picture (2024):
The 2024 race, held in April under hot conditions (approx. 40°C track temp), was won by Max Verstappen (Red Bull) using a two-stop strategy (C2 Medium -> C2 Medium -> C1 Hard). Sergio Perez (Red Bull) finished second, with Carlos Sainz (then Ferrari) third. The start saw the field split between Medium (12 cars) and Soft (8 cars). An early red flag (Albon/Ricciardo collision) allowed seven drivers to change compounds for the restart. Despite the prevalence of two-stoppers, Charles Leclerc (Ferrari) successfully executed a one-stop (Medium -> Hard, stopping lap 26) to finish P4 after starting P8, demonstrating its potential viability even with significant thermal degradation. This year with what is on paper a big performance differential between the compounds, a one-stop could prove more complicated, although one must wait and see what influence the newly surfaced part of the track might have, as well as what the temperatures will be this weekend. The C1 (Hard) saw the most use (61% of laps), followed by C2 (Medium, 31%), while the C3 (Soft) was primarily used for short stints due to its performance drop-off.
Braking Demands:
While Suzuka is known for its flowing, high-speed corners, specific braking zones are demanding. The long, fast turns mean braking isn't as frequent or severe as on some other tracks, but key points require significant stopping power:
-
Turn 16 (Chicane Entry): The most demanding braking zone. Cars decelerate by approximately 200 km/h in just over 2 seconds and 106 metres (348 feet).
-
Turn 11 (Hairpin Entry): Challenging due to braking occurring during the high-G Turn 10.
-
Turn 9 (Degner 2 Entry): Also considered demanding for the braking system.
Overall, the track is not considered exceptionally hard on brakes compared to circuits with multiple heavy stops from high speed, but these specific corners require effective braking performance and stability.
F1 BREMBO BRAKING DATA
| Turn | Initial Speed (km/h) | Final Speed (km/h) | Stopping Distance (m) | Braking Time (sec) | Maximum Deceleration (g) | Maximum Pedal Load (kg) | Braking Power (kW) |
|---|---|---|---|---|---|---|---|
| = 02 | 308 | 184 | 91 | 1.38 | 3.6 | 100 | 1,453 |
| = 06 | 250 | 211 | 39 | 0.64 | 3.3 | 110 | 1,273 |
| ≡ 09 | 262 | 132 | 75 | 1.45 | 4.4 | 166 | 2,102 |
| = 11 | 261 | 75 | 101 | 2.56 | 3.9 | 139 | 1,712 |
| = 13 | 298 | 252 | 37 | 0.49 | 3.8 | 119 | 1,693 |
| - 14 | 250 | 197 | 52 | 0.87 | 2.4 | 60 | 670 |
| ≡ 16 | 303 | 103 | 106 | 2.17 | 4.5 | 166 | 2,360 |
| - 17 | 116 | 99 | 14 | 0.47 | 1.9 | 70 | 316 |
Weather Outlook and Its Impact:
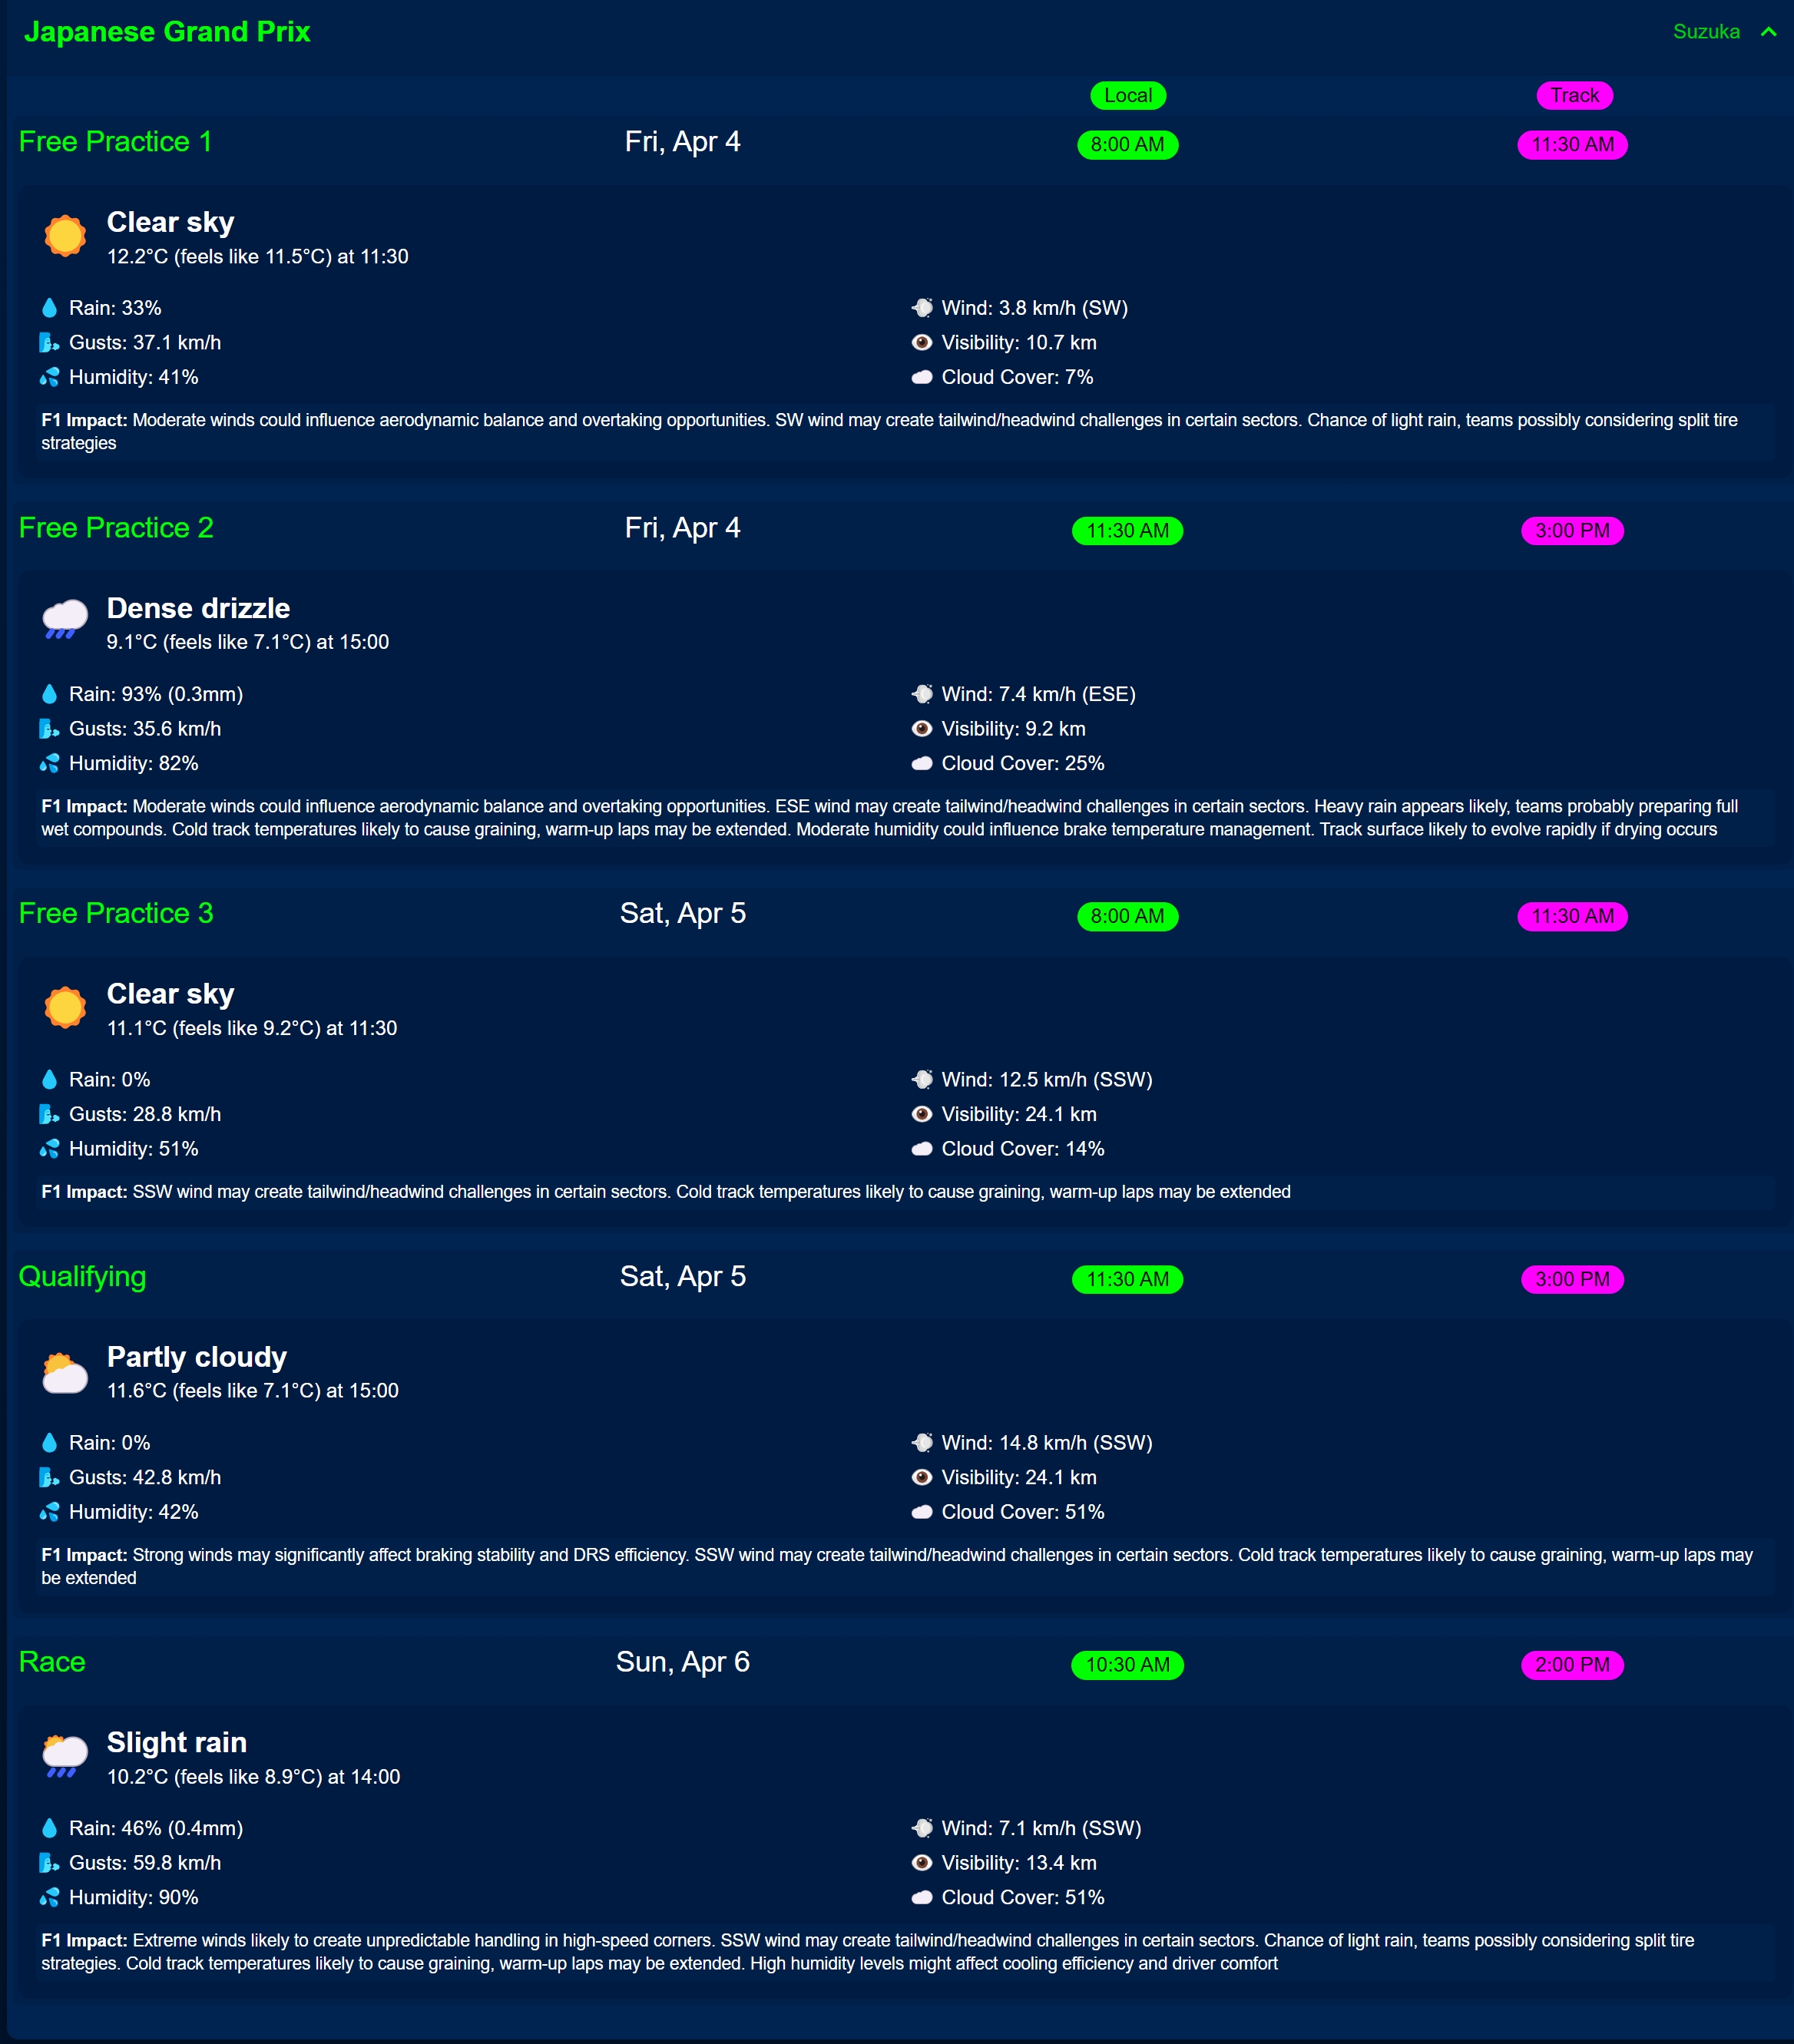
Suzuka's weather, much like Spa's, is notoriously unpredictable, regardless of the time of year (previously October, now April). Rainfall has frequently influenced proceedings. While the April slot generally sees lower rainfall than October, the coastal climate remains capricious. The forecast for the 2025 race weekend suggests 33% chance of rain for FP1, 93% for FP2, relatively dry FP3 and Qualifying sessions. 46% chance of rain at the race start. However, teams will remain extremely vigilant, as conditions can change rapidly, potentially disrupting run plans and race strategy. Weather radar will be closely monitored.
Overtaking Opportunities:
Overtaking at Suzuka is notoriously difficult due to the track's narrowness and the prevalence of high-speed, flowing corners where following closely is challenging.
-
Main Straight (Turn 18 to Turn 1): This is the only DRS zone on the circuit and represents the primary overtaking opportunity. A strong exit from the final chicane (Turns 16/17) is absolutely critical to mount an attack here.
-
Other Potential (Difficult) Spots: While less common, moves can sometimes be attempted under braking into the hairpin (Turn 11) or the final chicane (Turn 16), but these carry significant risk.
The difficulty is reflected in statistics: 29 of the 34 races held at Suzuka have been won from the front row (18 from pole position, 11 from P2). Of the other four, three have come from row three – but the real outlier is 2005, when Kimi Räikkönen won from P17.
Historical Records and Statistics:
-
Total F1 GPs in Japan: 40 (First in 1976).
-
Circuits Used: Suzuka (34 GPs, first in 1987), Fuji (4 GPs: 1976, 1977, 2007, 2008), Aida (2 Pacific GPs: 1994, 1995).
-
Most Driver Wins (Japan): Michael Schumacher (8 total: 6 at Suzuka with Benetton/Ferrari, 2 at Aida with Benetton).
-
Most Driver Wins (Suzuka): Michael Schumacher (6). Lewis Hamilton is second with 5 Japanese GP wins (4 Suzuka, 1 Fuji).
-
Drivers Winning at Both Fuji & Suzuka: Fernando Alonso (Suzuka 2006, Fuji 2008), Lewis Hamilton.
-
Most Team Wins (Suzuka): McLaren (9). Ferrari and Red Bull are tied second with 7 wins each.
-
Most Poles (Suzuka): Michael Schumacher (8).
-
Most Team Poles (Suzuka): Ferrari (10).
-
Championship Deciders (Suzuka): The Drivers' title has been decided 12 times at Suzuka (plus once at Fuji in 1976, and once at Aida in 1995). Champions crowned at Suzuka: Piquet (1987), Senna (1988, 1990, 1991), Prost (1989), Hill (1996), Häkkinen (1998, 1999), M. Schumacher (2000, 2003), Vettel (2011), Verstappen (2022).
-
Constructors' Titles Decided (Suzuka): 9 times (McLaren 1990, 1998; Benetton 1995; Williams 1997; Ferrari 1999, 2003; Mercedes 2016, 2019; Red Bull 2023).
-
Outlier Victory: Kimi Räikkönen's 2005 win from P17 remains the lowest starting position for a Suzuka winner.
2025 Japanese Grand Prix - Stats
Circuit Characteristics
| Characteristic | Value |
|---|---|
| Circuit Length | 5.807 km |
| Race Laps | 53 |
| Race Distance | 307.5 km |
| Number of Corners | 18 (8 L / 10 R) |
| Distance from Pole to First Braking Zone | 277 m |
| Pole Position Side | Left |
| Pit Lane Length Under Speed Limit Control | 395 m |
| Drive-Through Time at 80 km/h | 17.7s |
| Lap Time At Full Throttle | 62% |
| Lap Distance At Full Throttle | 69% |
| Gear Changes Per Lap | 47 |
| Braking Events (>2G) | 4 |
| Heavy Braking Events (<0.4s @ >4G) | 1 |
| Braking Energy | Low |
| Maximum Lateral G-Force | 4.8 (T1) |
| Maximum Speed | 323 km/h |
| Fuel Consumption | Low |
| DRS Zones | T18 – T1 |
| Key Overtaking Opportunities | T1, T7 |
2024 Statistics
| Statistic | Value |
|---|---|
| Fastest Lap FP1 | 1:30:056 |
| Fastest Lap FP2 | 1:34.725 |
| Fastest Lap FP3 | 1:29:563 |
| Fastest Lap Q1 | 1:28:866 |
| Fastest Lap Q2 | 1:28:740 |
| Fastest Lap Q3 | 1:28:197 |
| Delta FP1 to Q3 | -2.859s |
| Delta Q1 to Q3 | -0.669s |
| Podium | VER/PER/SAI |
| Team Result | RUS P7 / HAM P9 |
| Fastest Race Lap | 1:33.706 (VER) |
| Winning Race Time | 1:54:23.566 |
| Winning Average Speed | 162 km/h |
| Race Speed Trap | 310 km/h (HUL) |
| Winning Strategy | 3 Stops (L1 / L16 / L34) |
| Total Pit Stops | 54 |
| Total Normal Overtakes | 17 |
| Total DRS Overtakes | 29 |
Race Characteristics (2018, 2019 & 2022-2024)
| Characteristic | Value |
|---|---|
| Races Featuring Safety Car | 3/5 |
| Total Safety Car Deployments | 3 |
| Safety Car Probability | 60% |
| Safety Car Ratio | 0.6 |
| Wet Sessions | 5/25 |
| Wet Session Probability | 20% |
| Average Track Temperature | 27.5°C |
| Maximum Track Temperature | 40°C |
| Average Ambient Temperature | 21.5°C |
| Maximum Ambient Temperature | 27°C |
| Ambient Pressure | 1013.1 hPa |
Tyre Allocation
| Compound | Sets Per Driver |
|---|---|
| Soft | 8 |
| Medium | 3 |
| Hard | 2 |
Follow me on Bsky, Twitter, Mastodon, Instagram, Sub-Reddit, Threads for more analysis
Follow me on Whatsapp, Telegram, Facebook, YouTube, LinkedIn, Pixelfed, Tumblr, Bsky, Twitter, Mastodon, Instagram, Sub-Reddit, Threads for more analysis!